Step-by-Step Guide: How to Install a Putting Green in Your Backyard
Welcome to Putting Green JM, your go-to resource for all things golf and backyard aesthetics. In this comprehensive guide, we’ll walk you through the process of installing a putting green right in your backyard, transforming it into your personal golf oasis.
Why Choose Putting Green JM for Your Putting Green Installation:
Proven Expertise: With years of experience in golf and landscaping, Putting Green JM is your trusted partner for turning your backyard into a golf lover’s haven.
Detailed Instructions: Our step-by-step guide provides detailed instructions, ensuring a smooth and successful installation process.
Quality Resources: Explore our collection of top-notch materials and tools, carefully curated to make your putting green installation a breeze.
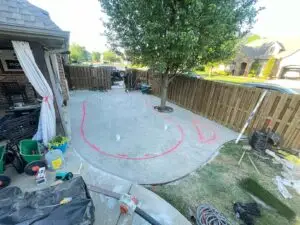
Mark and Measure the Area:
- Begin by marking and measuring the area where you will construct the putting green.
- Ensure accurate measurements to plan for the appropriate size.
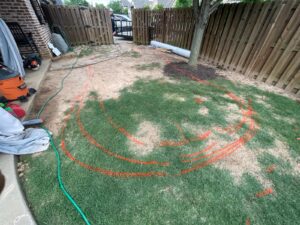
Remove Existing Vegetation:
- Clear the designated area of any existing vegetation, plants, or grass.
- Make sure the ground is free from any obstacles that could interfere with the construction.
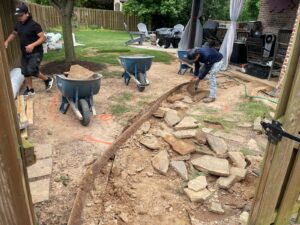
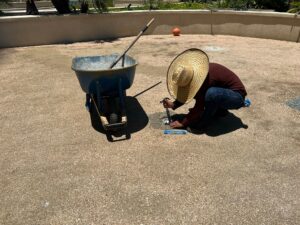
Gravel Base:
You will need a layer of gravel to provide a firm and level base. The quantity will depend on the size of your putting green, but generally, a layer of 5-10 cm is sufficient.
Placing Putting Cups with Client Input:
Collaborate with the client to decide on the desired locations for the putting cups and mark these positions on the putting green.
Colocación del Concreto:
- Ubica la copa en el agujero preparado y vierte concreto alrededor de la base para asegurar una fijación sólida.
- Asegúrate de que la copa esté centrada y nivelada antes de que el concreto comience a fraguar.
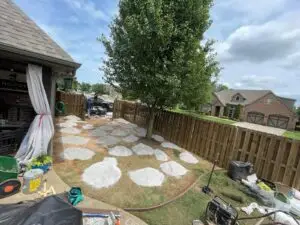
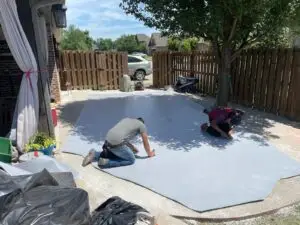
Cushion First, Green Next” – Preparing Your Putting Green with Underlayment!
- Underlayment Setup:
- Lay down a shock-absorbing underlayment or foam pad across your putting green area.
- Ensure full coverage for added comfort and shock absorption.
- Smooth out wrinkles, secure the edges, and get ready to roll out the artificial turf for a pristine putting experience!
- Underlayment Setup:
Turf Transformation with WeedBlock!
Unleash, Trim, Secure:
- Unroll the artificial turf, covering the putting green area.
- Precisely cut edges and shapes with a sharp knife.
- Secure the turf edges using WeedBlock, ensuring a flawless and weed-resistant putting surface.
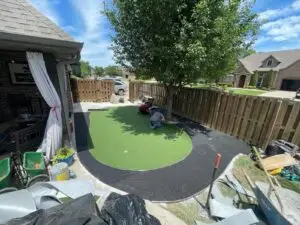
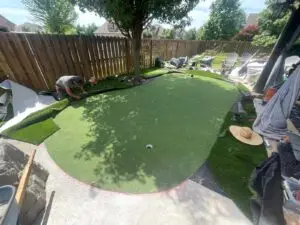
Wrapping the Putting Green – Artificial Turf Installation!
- Installing Artificial Turf Around the Putting Green:
- Continue rolling out the artificial turf to cover the fringe and the surrounding areas of the putting green.
- Use the sharp knife to trim and shape the turf as needed for a seamless transition.
- Secure the turf edges with WeedBlock, completing the installation for a consistent and visually appealing artificial putting green landscape.
- Installing Artificial Turf Around the Putting Green:
-
Sanding the Green – Finishing Touch with Silky Smooth Sand!
- Evening Out with Sand:
- Spread a thin layer of sand evenly across the entire putting green surface.
- Use a rake to ensure uniform distribution and to enhance the stability and playability of your turf.
- This final touch will provide a silky smooth surface, perfect for achieving consistent and satisfying putts.
- Evening Out with Sand:
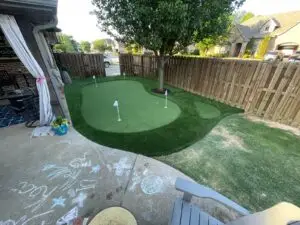
Revel in Your Putting Paradise – Final Outcome!
- Admire Your Completed Putting Green:
- Stand back and appreciate the finished result of your artificial turf installation.
- Take pride in your weed-resistant, professionally edged, and meticulously crafted putting green oasis.
- Congratulations on transforming your outdoor space into a stunning and enjoyable putting paradise!
- Admire Your Completed Putting Green: